• Home
  • Blog
  • Archive
  • Contact
  • About
Menu

Cassandra Morgan

Street Address
City, State, Zip
Phone Number

Your Custom Text Here

Cassandra Morgan

  • Home
  • Blog
  • Archive
  • Contact
  • About

How To: Make Temporary Tattoos

January 7, 2019 Cassandra Morgan
Ribbons.jpg

Back in September 2018, I made some temporary tattoos for an event my daughter’s dance studio was attending. I posted some pictures of them on my Instagram and some people asked me how I made them. It’s not nearly as difficult as one would think. So here is a quick walk-through on how to make your own temporary tattoos.

Supplies needed:
Temporary Tattoo Paper
Inkjet printer
Scissors or paper cutting machine (like a Cricut or Silhouette)

TempTattooPaper.jpg

The temporary tattoo paper I use is from Silhouette. Not only does Silhouette have cutting machines, they also have a stamp making machine, a 3D printer, and a ton of crafting supplies (like colored vinyl, heat transfers for fabrics, and glass etching, to name a few). I will admit that the temporary tattoo paper is a little on the expensive side. It is $10 for 2 sheets. However, you can get a lot of use out each sheet, depending on how large your designs are. If you don’t want to buy the paper online, it is also available in-store at many Joann Fabric locations.

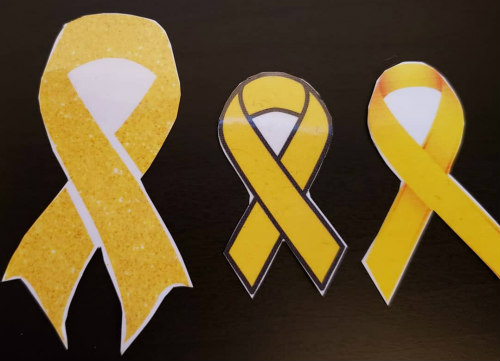
Create your design in your preferred software. For the yellow ribbons, I downloaded a few designs from various graphics websites and lined them all up in a Word document. If you are creating your own design, you could do it in Photoshop. Silhouette also has a design studio where you can purchase designs from artists for your use. (I think Cricut is similar but I only own a Silhouette machine so that is what I am most familiar with.) If you are using a design with text or numbers, make sure you flip the design before you print it. Otherwise, your text will come out backwards when you apply the tattoo to skin.

Once you have your design ready, you want to print it onto the tattoo paper. (Again, don’t forget to flip any designs with text or numbers or if you want your design to face a specific way!) When you load the tattoo paper into your printer, make sure that the sticky side is the side getting printed on. My printer prints on the ‘bottom’ side of the paper in the feeder so I would put the tattoo paper in with the sticky side down. After your design has printed, set the paper aside for a bit to let the ink dry.

Now comes the difficult part. The clear adhesive sheet needs to be applied to the sticky side of the tattoo paper. Most likely, you won’t get the right on the first try. And that is OK. It took me a few tries before I found a technique that works for me.

At the top of the adhesive sheet is a small peel-off strip. Just peel that part off. This will attach to the top of the sticky side of your tattoo paper. Try to get the two pages to line up as straight as possible. Once that little adhesive strip is attached to your tattoo paper, carefully peel off the rest of the paper on the adhesive sheet. Slowly press the adhesive sheet onto the tattoo paper. As you press the adhesive sheet down, try to keep even pressure on the whole page. The goal is to have no air bubbles on any of the designs. (It doesn’t matter if there are air bubbles on the parts of the paper without the design. We’re going to cut that off anyway.)

When the entire adhesive sheet is attached to the tattoo paper, you can move onto cutting out your designs. If you have a cutting machine, you can follow the directions on your specific machine so it knows where to cut. Personally, I just cut my designs out with scissors. Whichever method you use, try to cut as closely to the edges of the design as possible. The least amount of “white space” on the finished tattoo, the better.

And that’s it! All you need to do now is apply the temporary tattoo. While I have only ever applied temporary tattoos to skin, I have read that some people apply them to woodworking pieces then cover it with a clear coat. Both applications would work the same - peel off the clear adhesive sheet from the design. Place the design on your skin/wood sticky side down. Take a damp cloth and wet the back of the paper. Slowly peel the paper from the design. There is your temporary tattoo.

RibbonTattoo.jpg


As a warning, any clear spaces on the design that aren’t cut out can be a little sticky for a bit. Make sure your tattoo is completely dry before doing anything where it would pick up dirt. The tattoo will wash over after a couple of days or you can remove it faster with some rubbing alcohol. It’s a great way to show some team spirit without a ton of work.

Good luck!

In How To Tags how to, temporary tattoo, how to make a temporary tattoo, Silhouette, temporary tattoo paper, how to make my own temporary tattoo
Comment

This new thing cars have nowadays

February 25, 2016 Cassandra Morgan

Cars, nowadays, have this new fangled thing that no one seems to know how to use properly. They're called HEADLIGHTS. For some reason, a majority of people seem to think that the sole purpose of headlights is to allow you to see at night. A majority of people are incorrect.

I'm not saying that headlights don't help you see better at night. However, headlights do help other drivers see you better in non-ideal conditions. What does this mean? It means that, on days when it is rainy or foggy or snowy, your car's headlights make it easier for the other drivers on the road to see your car. How many times have you been driving in the rain when, all of a sudden, a grey car without his lights on comes out of nowhere almost causing an accident? I'm sure it's happened more than once.

Let me say this once again:

Your Headlights Are Not For You.

Please, in the future, unless it is a bright sunny day outside, just turn on your headlights. Hey, even when it is bright and sunny outside, turn on your headlights. It will help you get into the habit of turning them on when it's gross out. You will make everyone on the road a lot safer.

Thank you.

In How To Tags car, headlights, safety
Comment

(Fact) Check Yourself!

October 20, 2015 Cassandra Morgan

Everyone has that Facebook friend. The person that shares every homeopathic "cure" they see, whether or not it actually works. But it doesn't stop with people talking about the healing properties of pineapples. Thanks to people not fact-checking things before sharing them, some people actually believe that Mr. Rogers was a NAVY seal before starring on his television show or that any number of celebrities died prematurely. The question is - why don't any of these people fact check the information before sharing it? Here are some easy ways to check if that fact you are sharing is correct.

  1. Google it. Everyone has access to Google. I bet you even have it on your phone. Simply type a few keywords into the search engine (for example: "pineapple cough") and you will likely find the answer quickly.
  2. Snopes.com. Run by a husband and wife team, the website specializes in debunking urban myths. This is one of the best fact checking sources around.

Honestly, these are your two best sources. There are some other, smaller, website around (like Truth or Fiction) but they aren't as established as Snopes.

So, before you click on that share button, make sure you check yourself before you wreck yourself. (Yeah, I went there.) And feel free to check other people. Sure, they may get angry that someone showed their gullibility but maybe they will think twice before blindly sharing. After all, knowledge is power.

In How To, Computers/Internet Tags fact check, Snopes, Truth or Fiction, snopes.com, truthorfiction.com, Facebook
1 Comment

So You Want To Be A Reviewer

September 1, 2015 Cassandra Morgan

When people hear the word "reviewer," the first thing they think of is "free stuff." While you can sometimes get free stuff, that isn't always the case. And a lot of times, that free stuff isn't stuff you actually want. Still want to be a reviewer? Read on!

Whether you have a blog or a vlog, the road to reviewing is the same. Since companies want their product to be seen by the largest amount of people possible, they tend to want to work with established reviewers. But how does someone become established? 

The first step is to figure out what you want to review. Would you like to review baby products or would you prefer to  talk about dog toys? Perhaps your love of movies pushes you into becoming a movie reviewer. It's OK if you don't have a specific niche. Just keep in mind that a more general website might not have as large an audience as one dedicated to a specific topic. 

Once you have your niche in mind, just start reviewing things. Talk about things you already own or things you recently purchased. Talk about that item your best friend uses every day. This is where a majority of reviewers begin. If it's stuff you already own or you are already going to buy, you might as well take advantage of the situation and talk about it! 

Here is where the difficult part begins. You need to get your reviews seen by people. While cross-posting (posting your content on different platforms) sounds like a great idea, you want people to visit your site. Instead of posting your entire review on Tumblr, post the first paragraph and a link to the rest of the review. This won't work for reviews on Amazon, where you will need to post a full review, but you can put a link to your blog at the bottom. And make sure you are posting links to all of this on Twitter, Facebook, Instagram, and other social media sites. 

Becoming an established reviewer doesn't happen overnight. If you need to find some additional items for review, you can try websites like Tomoson, BzzAgent, or Influenster. There are quite a few websites out there looking to connect companies with bloggers. Do some research to find the ones that fit your style. 

When you have a decent following, you can create a media kit for your site. A media kit is a one- or two-page document that tells a company who you are and who your audience is. (My media kit can be found on my contact page.) Once your media kit is ready, you can send it out to companies to see if they will partner with you.  Don't be discouraged if you don't hear back from them. Companies have a lot of people contacting them. They can't reply to everyone. 

And there you have it. You are a reviewer. I know, it seems much more difficult but it's not. Just make sure that you are in it because you love it and not for the free stuff. Your reviews will definitely suffer if you are reviewing things you don't care about. 

In How To Tags review, reviewer, how to become a reviewer, blogging
Comment

Subscribe

Sign up for our weekly newsletter

We respect your privacy.

Thank you!
Archive
  • March 2025
  • February 2025
  • January 2025
  • December 2024
  • November 2024
  • October 2024
  • September 2024
  • March 2024
  • February 2024
  • January 2024
  • December 2023
  • November 2023
  • October 2023
  • February 2023
  • January 2023
  • December 2022
  • November 2022
  • October 2022
  • September 2022
  • August 2022
  • February 2022
  • January 2022
  • December 2021
  • November 2021
  • October 2021
  • September 2021
  • January 2021
  • December 2020
  • November 2020
  • December 2019
  • November 2019
  • February 2019
  • January 2019
  • December 2018
  • November 2018
  • May 2017
  • April 2017
  • October 2016
  • April 2016
  • February 2016
  • January 2016
  • October 2015
  • September 2015
  • August 2015
  • July 2015
  • June 2015
  • May 2015
  • April 2015
  • March 2015
  • February 2015
  • January 2015
  • December 2014
  • November 2014
  • October 2014
  • September 2014
  • August 2014
  • June 2014
  • May 2014
  • April 2014
  • March 2014
  • February 2014
  • January 2014
  • November 2013
  • September 2013
  • August 2013
  • July 2013
  • June 2013
  • May 2013
  • April 2013
  • March 2013
  • February 2013
  • January 2013
  • December 2012
  • November 2012
  • October 2012
  • September 2012
  • August 2012
  • July 2012
  • June 2012
  • May 2012
  • April 2012
  • March 2012
  • February 2012
  • January 2012
  • December 2011
  • November 2011
  • October 2011
  • September 2011
  • August 2011
  • July 2011
  • June 2011
  • May 2011
  • April 2011
  • March 2011
  • February 2011
  • January 2011
  • December 2010
  • November 2010
  • October 2010
  • September 2010
  • August 2010
  • July 2010
  • June 2010
  • May 2010
  • April 2010
  • March 2010
  • February 2010
  • January 2010
  • December 2009
  • November 2009
  • October 2009
  • September 2009
  • August 2009
  • July 2009
  • June 2009
  • May 2009
  • April 2009
  • March 2009
  • February 2009
  • January 2009
  • December 2008
  • November 2008
  • October 2008
  • September 2008
  • August 2008
  • July 2008
  • June 2008
  • May 2008
  • April 2008
  • March 2008
  • February 2008
  • January 2008
  • December 2007
  • November 2007
  • October 2007
  • September 2007
  • August 2007
  • July 2007